- Introduction
- The Tech
- Setting Up
- Next Steps: A Proper Interface
- Security Considerations
- Gotchas and Things I Learned the Hard Way
Introduction
This is a very surface level glance at what I've done to set up a server capable of accepting WebRTC and RTMP video and present it for either public consumption or re-stream in an event environment in 2024. The state of things: Flash is dead, RTMP is hanging on by a thread, browsers have in-built support for video via WebRTC but it's not quite batteries-included, and we can get sub-second latency on this pipeline with the right pokes and pushes.
The tech mentioned here should snap together to let someone present a simple ingest you can fire video at via OBS-Studio, and play back in a web page and have around one second of latency. This should be doable on a $5/mo VPS with 1GB of RAM and a 2GHz CPU with no special hardware or need to re-encode the video.
Some JavaScript (and maybe even backend) work is required but the simplest of presentations should just be paste and go.
Who This Is For
There's two primary use-cases I had in mind when designing this ball of wax:
- Event organizers who will need to take in many different streams and somehow bundle them together into a final presentation.
- People who want to create a private community screen share call experience like Discord without relying on silos.
Really this is optimal for self-hosting any kind of solution where you need to take in and distribute multiple streams in some combined layout.
Who This Is Not For
If you just want to run your own self-hosted livestream without Twitch or YouTube, look at Owncast. My solution here will be missing so many pieces and Owncast is super solid deploy-and-go kit. It uses RTMP and has more latency but it comes with chat, a slick web page, its own player interface, and admin panel.
If you want full automation where you run an event and don't need someone's butt in the seat doing production, this will get you close but not quite. I'll try to remember to talk about the final steps to get there at the end.
The Tech
Hardware
You'll need a system to host all this on. Unfortunately some Linux familiarity will be required. Distro shouldn't matter as long as you can get all the required software. I did this on Archlinux as it just has everything involved available as an official package. The requirements are extremely light. I'm running my testbed for this on a $5/mo VPS with 1GB of RAM and a 2GHz guaranteed virtual processor. On this I've hosted a Discord-like screen share call of 8 people sharing their streams with each other. So that's 8 incoming streams and 64 outgoing. I can probably push this up to around 9 users, or around 80-100 viewers in a one-to-many livestream format, before hitting CPU contention.
Unless you save local recordings, storage space is minuscule: base OS footprint and maybe 1-2GB more for software.
Bandwidth
This is going to be the sticky point and the source of most of your cost. Any VPS you use is going to have a transit limit, or transit fee. If you host on residential internet you might have upload limit issues.
As a guideline to figuring this out, we'll need to decide some things up front. Whether you're just streaming yourself or providing a backend for an event or doing a screen share party, you'll be picking the stream bitrate. Based on that we can calculate needed upload bandwidth and transit use.
First we need to determine how many incoming and outgoing streams to expect at once. A large factor in this is the use-case for what you're doing...
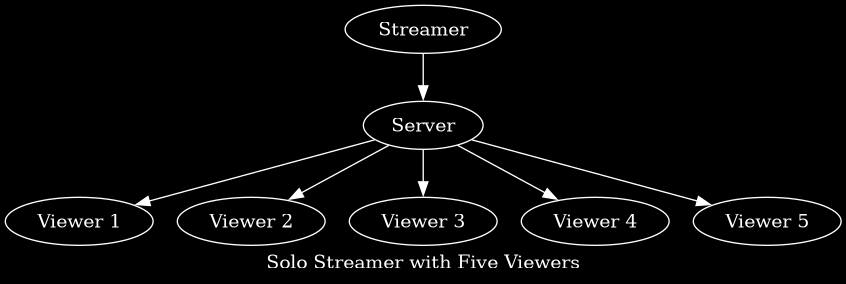
If you're a solo streamer to an audience, there'll be one incoming stream total and one outgoing stream per viewer:
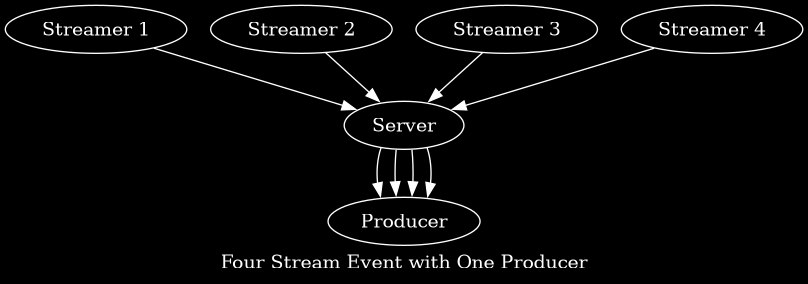
If you're running an event with multiple streamers and a producer, there'll be one incoming and one outgoing stream per streamer:
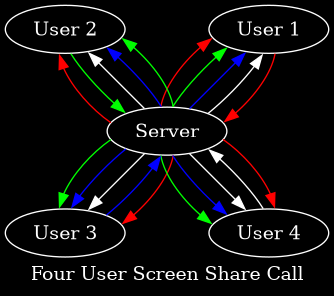
If you're replicating a Discord screen share calling experience, there'll be one incoming stream per user and your outgoing stream count is equal to your user count squared:
Your total incoming bandwidth is equal to your bitrate (audio + video) times your incoming stream count. Same with outgoing. So for example if you plan to push 2000kbps video and 256kbps audio streams and you're a solo streamer expecting five viewers, it looks like this:
- Incoming: 1 stream at (2000 + 256 = 2256)kbps or 2.25mbps
- Outgoing: 5 streams at 2256kbps = 11280kbps or 11.28mbps
If you're doing a screen share call with 8 users with the same bitrate...
- Incoming: 8 streams at 2256kbps = 18048kbps or 18.0mbps
- Outgoing: 8 × 8 = 64 streams at 2256kbps = 144384kbps or 144.3mbps
If you're doing many-to-many streaming the cost balloons quickly as you can see. Most VPS providers will give you gigabit, or 1000mbps, so you could handle around 20 users like this before you hit bandwidth issues, presuming you do get gigabit.
Once you've figured out if your network can handle the load, you also have to calculate costs. You have your expected bandwidth per second. Now take that and multiply it by how often you plan to be streaming.
Using our solo stream example, if you stream four hours a day five days a week, you can calculate your outgoing like so:
11.28mbps × (3600 × 4) = 162432mbit, or 162.4 gigabits a day
162.4gbit × 20 = 3248gbit or 3.25 terabits a month (ish)
If your host charges bandwidth in bytes, divide by eight, so 406GB/month. Most hosts give you either 1 or 2 terabytes per month in transit with a cheap VPS, so you'll burn about 400GB of that on 5 viewers at 2256kbps and come in comfortably under the limit.
Figuring this out ahead of time will prevent nasty surprises like a huge bandwidth bill or your service being cut off. Of course you can always reduce your bitrate if you're worried about hitting limits.
Software
The meat and potatoes of all this. I'll briefly go over what's being used and then in more detail in the next section:
- Any Linux host, distro doesn't matter. If you're using something strange like Alpine you might have to tweak my instructions.
- OvenMediaEngine for the video stream handling.
- OvenPlayer for actually playing back the video.
- Caddy for a super simple web server that'll handle TLS certs for you.
- OBS Studio for both streaming to the server and capturing what comes out if you're running events.
- Some custom HTML and JavaScript, I'll be giving an extremely bare-bones example.
- Some bonus optional backend code to do management stuff. I wrote it in Python
You'll also probably want a domain to run all this on. You don't strictly need one, but you won't have TLS that works right without it. You don't need an entire domain. You can use a subdomain, or even a sub-path and different ports on an already extant server.
Setting Up
Understanding the Tech
We are going to be setting up OvenMediaEngine to accept both RTMP and WebRTC from OBS Studio. RTMP is an old protocol still heavily in use today for streaming services like Twitch; WebRTC is the new hotness that's typically used in video calls and meeting software. To facilitate WebRTC connections, OvenMediaEngine and OBS will use a protocol called WHIP (WebRTC HTTP Ingestion Protocol) to simplify the connection.
Typically WebRTC is heavily peer-to-peer. In a streaming environment where we're expecting a server to receive and process the video, that's not desired. WHIP lets the server present itself as the only valid peer in the WebRTC session, so everyone uses the server as an intermediary. As a result, no peer-to-peer connections are made, no one's IP address is revealed to anyone else, and the server handles all the traffic itself.
If you're wondering why all that jargon above isn't linked to some helpful documentation page better explaining what they are... well... to be quite honest documentation on all this stuff is trash as of this writing. I don't have anything good to link you.
Once the server is receiving the video, we'll also be creating a web page to present the video using OvenPlayer.
OvenMedia May Have A Onebox Solution for You!
Before going much further check out OvenSpace. It may just do what you want out of the box if what you want is meeting software. We're going with homebrew because I'm targeting event production more than meetings, and need more customization.
I have no experience with OvenSpace.
Why both WebRTC and RTMP?
If WebRTC is so great why am I leaving RTMP on at all? The reason comes down to how WebRTC works and how software in this toolchain talks WebRTC. First an important point: WebRTC by default talks over UDP. If you're not familiar with the networking differences between TCP and UDP that's okay.
In a nutshell: TCP is what almost everything now and days uses to do networking. It's a protocol that supports robust error-correcting transmission of data over networks, and will re-transmit lost or delayed traffic. UDP doesn't do this. UDP you pitch data down the wire and hope it gets there. If your network connection using WebRTC is at all lossy, bad things happen with dropped frames and lag.
There are ways to force a WebRTC session to use TCP: OBS Studio as of this writing (version 30.1) does not support them. So a streamer with any sort of networking noise whatsoever should use RTMP instead of WebRTC/WHIP.
We will be configuring the receiving end of this to force WebRTC over TCP, so this isn't an issue for viewers.
Setting Up Caddy
We need Caddy first because this is how we are going to get our TLS certificates and we need them for every other step. This should be as simple as installing caddy with your distro's package manager. Once it's installed, you can edit /etc/caddy/Caddyfile with your editor of choice and make sure a block that looks like this is somewhere in the configs:
https://example.net {
  root * /srv/http/example.net
  file_server
}
Your distro may package a default config that puts root somewhere else. If it does, follow its example instead. This tells Caddy what domain you're using and where the HTML files for its web service are. Also note by configuring https here, Caddy will set up an http-to-https redirect for you and manage LetsEncrypt certificates for free.
Make sure your DNS is set up before continuing. Replace example.net with your domain. Then configure Caddy to autostart and start it systemctl enable --now caddy. If no errors appear, this should grab a TLS cert for your domain automatically.
Setting Up OME
Let's presume you have your Linux system up and accessible and ready. The first step is installing OvenMediaEngine. The devs have pretty good docs on that. I'm not a Docker person, but Archlinux provides official packages for OvenMediaEngine so I just did pacman -S ovenmediaengine and tada. If you don't use Docker and don't have an official package available, the build and run guide isn't bad.
Once it's up, you'll need to do two things: configure it to autostart and edit its config. Let's get the config in place first. You will need to edit /etc/ovenmediaengine/Server.xml with your editor of choice. It's a giant ball of XML. Most of this can be left default so I'll just step through the important bits.
TLS Certificates
First TLS:
<TLS>
    <CertPath>...</CertPath>
    <KeyPath>...</KeyPath>
</TLS>
This will appear multiple times in the config. We're going to do something a little unsupported and point these paths to the certificates Caddy grabbed for us. They should be in /var/lib/caddy/certificates/acme-v02.api.letsencrypt.org/example.net/, replacing example.net again. Look for the crt and the key file and plug them in for CertPath and KeyPath respectively.
OvenMediaEngine is packaged at least on my distro to run as root, which isn't great but also lets us cheat like this. If your install runs as a user, this might not work and you might need to play with hooks to copy the certificates somewhere accessible to Oven when Caddy updates them.
Virtual Hosts
OvenMediaEngine can do domain based virtual hosting like an HTTP server can. We're not going to use it here. You can just take a look at the VirtualHosts section of the config and make sure only one VirtualHost exists. Make sure its Name is default, it contains one of the TLS sections noted above, and it contains this:
<Host>
    <Names>
        <Name>*</Name>
    </Names>
    <TLS>
        [...]
    </TLS>
</Host>
This will make one default virtual host handle everything.
Planning Applications
The next big step is deciding what stream keys we want. We do this with two bits of jargon: Apps and Streams:
- Apps are blocks of configuration data sharing a path. For example streaming to
https://example.net:3334/app/stream,appis the name of an App and anything underappwill share a bunch of settings - Streams are akin to "Stream Keys" if you've done RTMP work. We don't configure these. Any stream key is valid by default. In the above example
streamis a Stream.
We need to declare Apps up front. If you're doing a solo stream or a community screen share software you can just use one. If you're doing some kind of event you may want multiple: one per match, one per timeslot, something. This example will use one.
In the VirtualHost section, there should be an Application block. Inside the Application block there's a Name, a Type, and an OutputProfile:
- Name is whatever you want to call it but this will be part of the streaming URL
- Type must be
live. There's alsovodfor recording and storing vods; we're not using that - The OutputProfile defines what format, bitrate, and resolution of video and audio is output. This is important
For a backend video server for a tournament, you may want Applications named like match-1, match-2, etc and have streamers point to Streams named slot-1, slot-2, etc to create a full streaming URL that looks like https://example.net:3334/match-1/slot-1. Or maybe you want every stream on one Application and just do https://example.net:3334/tournament/match-1-1.
Disabling Transcoding
In the OutputProfile, we need to disable transcoding. Transcoding is taking the video that's ingested and re-encoding it at a different bitrate, resolution, format, etc. We don't have the CPU or GPU power for this, we'll be taking a different approach of handing streamers an OBS config where everything is set how we want it. Look for the OutputProfiles section. Delete everything between and including <OutputProfile> and </OutputProfile> and replace it with this:
<OutputProfile>
    <Name>bypass_stream</Name>
    <OutputStreamName>${OriginStreamName}</OutputStreamName>
    <Encodes>
        <Video>
            <Name>bypass_video</Name>
            <Bypass>true</Bypass>
        </Video>
        <Audio>
            <Name>force_opus</Name>
            <Codec>opus</Codec>
            <Bitrate>128000</Bitrate>
            <Samplerate>48000</Samplerate>
            <Channel>2</Channel>
            <BypassIfMatch>
                <Codec>eq</Codec>
            </BypassIfMatch>
        </Audio>
    </Encodes>
</OutputProfile>
This is an encoding output profile that will simply bypass ingested video without touching it. It will also re-encode audio to the right format if the audio we receive is the wrong format. This is important because WebRTC expects audio in the opus format. If a streamer is sending video to the server using RTMP, the audio format may be wrong.
Do this OutputProfile replacement for every Application you want to serve.
Configuring Providers and Publishers
Each Application also needs configured Providers and Publishers. These terms are ambiguous so to make it clear:
- Providers are methods of ingesting video from a streamer's OBS.
- Publishers are methods of pushing out video to viewers
We will only need WebRTC as Publishers but we likely want WebRTC and RTMP as options for Providers. So this block should look like this:
<Providers>
    <WebRTC>
        <Timeout>30000</Timeout>
        <CrossDomains>
            <Url>*</Url>
        </CrossDomains>
      </WebRTC>
      <RTMP />
</Providers>
<Publishers>
    <AppWorkerCount>4</AppWorkerCount>
    <StreamWorkerCount>2</StreamWorkerCount>
    <WebRTC>
        <Timeout>30000</Timeout>
        <Rtx>true</Rtx>
        <Ulpfec>true</Ulpfec>
        <JitterBuffer>true</JitterBuffer>
    </WebRTC>
</Publishers>
There's a lot here, so step by step:
- The WebRTC Provider has a 30 second timeout (you may want to reduce this) and lets people stream to the server with WebRTC
- The
<RTMP />tag below this enables the RTMP Provider and it has no configuration so it's a standalone tag. AppWorkerCountandStreamWorkerCountcan be left default. You shouldn't need performance tweaking unless you're very big- The WebRTC Publisher sets three things here we haven't discussed yet:
- Rtx: Attempts to add dropped packet detection to WebRTC
- Ulpfec: Attempts to add additional network error correction to WebRTC
- JitterBuffer: Adds a little bit of video buffer to attempt to catch and correct audio/video desync
These odd sounding settings mostly apply to trying to improve WebRTC over UDP. There's debate if they help at all but they don't hurt to have on.
You'll need to copy this section into every Application.
Forcing TCP
Pretty much universally I feel UDP is a bad idea here. At minimum we want viewers to be receiving video over TCP, so let's enable that. There are two tags in the config called TcpForce, one is in the global Providers section and one is in the global Publishers section. I recommend turning both on by setting both to true, but keep in mind OBS will not respect being told to use TCP; it will continue to connect over UDP.
Under the hood this does more than say "Use TCP please" to anyone connecting to the server. OvenMediaEngine listens on a second port (3478 over TCP by default) for TCP connections and parrots anything it receives here to one of its ICE Candidates. ICE Candidates are, in essence peers eligible to receive WebRTC connections. Usually ICE is how you would do peer to peer calls, but here all of our ICE Candidates are open ports on our server (by default 10000 to 10004 over UDP).
This isn't actually important to getting this running; don't worry if it's complex. Just turn on TcpForce and keep in mind some non-compliant software will use UDP anyway. OvenPlayer, when we get to setting up our web page, absolutely will benefit from this.
Other Formats
If you leave things as the defaults, you get a couple other formats for handling video:
- OVT: OvenMedia's internal format for sending video between servers to create your own video network. Way beyond our paygrade.
- RTSPC: A format for pulling video from another source into the server, rather than taking pushes.
- SRT: An attempted replacement for RTMP. You could use SRT instead of RTMP as a matter of preference but I don't find it reliable.
- MPEGTS: A video transport protocol as part of the MPEG standard. I don't know much about it.
- LLHLS: Low latency HTTP Live Streaming. This exposes yet another way people can get video from the server. It's more resilient to network disruption than WebRTC but will come with up to 10 seconds of latency unless you have a "Low Latency" compliant viewer.
None of this guide will cover any of this and you can turn it all off by destroying the relevant config sections in the global Providers and Publishers blocks if you want.
Starting Up
We should now be ready to set OvenMediaEngine to autostart and start it up. Same as Caddy:
systemctl enable --now ovenmediaengine
Presuming no errors, OvenMediaEngine should be up and ready to receive video; but we need to be able to view it.
Setting Up An OvenPlayer
Let's loop back to Caddy. When we set it up we had a root path defined. That should represent a directory somewhere on the disk that Caddy will pull files from. Let's put an extremely basic video player there.
Whatever path that is, go there and create a file named player.html. This will be an extremely simple player. Dump this into it:
<div id="player_id"></div>

<script src="https://cdn.jsdelivr.net/npm/ovenplayer/dist/ovenplayer.js"></script>

<script>
    // Set Options
    const options = {
      sources: [
        {
          label: "Test",
          type: "webrtc",
          file: "wss://example.net:3334/app/stream"
        }
      ]
    }

    // Initialize OvenPlayer
    const player = OvenPlayer.create('player_id', options)
</script>
Make sure the replace example.net and also your app and stream with your Application name and your planned Stream key. That's it. Make sure Caddy can read the file you just created by executing chmod a+r player.html now browse to https://example.net/player.html to make sure you can see the player.
This page only does three things:
- Create a div that will be the container for our player
- Set one source in our options
- Initialize the player to "take over" the div, using the options we set
We are relying on jsdelivr to provide the OvenPlayer each time we start the page. If you find this uncomfy you can clone the OvenPlayer code to the server, but that's beyond the scope of this initial setup.
One player pointed to one key in a blank page won't do a ton for us, but we'll come back to this shortly.
Setting up OBS Studio for a Test Stream
If you haven't grabbed OBS yet, do so now. Getting familiar with it is a full book on its own, so we'll keep this simple for testing.
Later versions of OBS have a setup wizard, but it doesn't understand WHIP and WebRTC well, so skip that. Open File and then Settings. Now access the "Stream" section. First choose a Service type. If you're using WebRTC, select "WHIP". If you're using RTMP select "Custom". If you don't know, start with WHIP and we can step down to RTMP if it doesn't work well.
- WHIP: Server =
http://example.net:3333/app/stream?direction=whip - RTMP: Server =
rtmp://example.net:1935/appStream Key =stream
As I've said many times: replace example.net, app and stream. You may notice I'm using http on port 3333 for WHIP instead of https and 3334 as I used in the OvenPlayer. You can try https and 3334, but in my experience OBS refused to work this way. Either way will get to the same place; https is preferred of course, if you can get it working.
If you switch between RTMP and WHIP you may get warnings about audio format changes. This is fine. When we set up OvenMediaEngine we accounted for this by setting up a conditional audio transcode to make sure the audio is always in the right format when it reaches viewers.
Next switch to the Output section and change the Output Mode to Advanced. Set your Bitrate to whatever rate you decided to use, making sure RateControl is set to CBR. If you want to use a different RateControl, you can, but that's a more advanced matter of discussion for a later date.
Set KeyframeIntervalSec to 1, set Tune to zerolatency, and for EncoderOptions provide bframes=0. If some of these settings don't appear it may be because you're using Hardware Encoding and have different options. If so, you're a little on your own here.
Most of this stuff is optional. If you have a KeyframeIntervalSec not set to 1 the logs will complain, a lot, but it should be fine because we're not doing any kind of video transcoding to break OvenMediaEngine. bframes=0 is absolutely critical though. WebRTC does not support B-frames and, if you're streaming with RTMP, OBS can send B-frames and break the stream. Make sure you have this setting!
That should be all you need to change. Feel free to fire up a game and add a Window Capture source, or similar, so something is moving in the feed for testing, then click "Start Streaming".
One you start, go to your player.html and click play. You should see the video feed. Drag something around in the OBS canvas to see what your latency is like; it should be less than a second with these settings.
Next Steps: A Proper Interface
That's a lot of work just to get one stream working, I admit. Next is arguably the fun part. I'm going to get into some sections discussing tooling for various use-cases. Take or leave what interests you.
A Four-Player Stream Interface
Let's say you're the producer for a livestream that wants four players, four webcams, four something on the screen at once. We can take the pieces we have so far and make that happen.
First we need to decide what our four somethings are going to be named. You can call them slot-1 thru slot-4 or name them after who's going to be using them, or whatever. Let's go with slot-1 thru slot-4 for this and an Application called show. So your streaming URLs configured in OBS would be http://example.net:3333/show/slot-1?direction=whip or rtmp://example.net:1935/show with a key of slot-1... and so on for 2, 3, 4.
Instruct your guests to use those keys. Even better: make them a portable OBS and give it to them! Now we need to get them together on a screen.
player.html we discussed before did one player, so let's expand that to four. Do something like this in a web page:
<div id="slot-1"></div>
<div id="slot-2"></div>
<div id="slot-3"></div>
<div id="slot-4"></div>

<script src="https://cdn.jsdelivr.net/npm/ovenplayer/dist/ovenplayer.js"></script>

<script>
    // Initialize OvenPlayers
    const player1 = OvenPlayer.create('slot-1', {sources: [label: "slot-1", type: "webrtc", file: "wss://example.net:3334/show/slot-1"]})
    const player2 = OvenPlayer.create('slot-2', {sources: [label: "slot-2", type: "webrtc", file: "wss://example.net:3334/show/slot-2"]})
    const player3 = OvenPlayer.create('slot-3', {sources: [label: "slot-3", type: "webrtc", file: "wss://example.net:3334/show/slot-3"]})
    const player4 = OvenPlayer.create('slot-4', {sources: [label: "slot-4", type: "webrtc", file: "wss://example.net:3334/show/slot-4"]})
</script>
We haven't changed much. We've made four divs and created four players pointing to our four slots. This is going to be ugly though. They're going to just be in a vertical line. That's where CSS comes in.
You can create a CSS stylesheet that takes these divs and moves them around the page (and even resizes them) by their IDs. For example to move the second slot in line with the first and 600px from the left border and resize the player to 800x600:
#slot-2 {
  position: absolute;
  left: 600px;
  top: 0px;
  width: 800px;
  height: 600px;
}
The OvenPlayers will do backflips to keep the video in panel and scaled properly. You may get pillarboxing or letterboxing if you violate the video's aspect ratio with your resizing, though.
You can position these players on a web page you style with your overlay, put a background here, put names in boxes, etc. Or, you can do something a tiny bit more clever and make this page serve nothing but precision-placed players, and do all your styling in OBS.
In either case once you're happy with the page you want to capture it in an OBS BrowserSource. Once you do, you can then place overlay graphics over the page, leaving cutouts in the graphics for the video players. Check this hastily scrawled graphic out:

See the darker black rectangles? Those are transparent. If you drop this image over top of a BrowserSource capturing four video OvenPlayers in the same locations, it'll blend together into a seamless presentation. You'd likely want to use Text Sources for the text elements instead of baking them straight into the overlay image, but hopefully this showcases the trick.
For controlling these players, you can right click the BrowserSource in OBS and select "Interact". You will get a window in which you can click on OvenPlayers to control their volume, play and pause, etc. If you don't interact with an OvenPlayer for a second, the control interface will disappear, so get your audio nice and balanced and everyone playing before you start streaming or recording and it'll look great.
...well as long as you don't use my ugly test image.
Portable OBS
If you're going to have multiple guests you may want to eliminate guesswork and just give them a working config so they can click and go. You can do this with a "Portable OBS" configuration. First grab OBS. Not the installer, but the ZIP version. You may have to grab this from the OBS Github. The Asset that is simply "OBS-Studio-30.1.1.zip" should just be a ZIP file of a Windows install; or whatever version is new.
Extract that somewhere and, before you launch it, create a text file named "portable_mode.txt" immediately in its top directory. It doesn't need to contain anything. Just create it. Now go to bin/ and launch obs.exe. OBS should be in portable mode and save any changes you make in the OBS directory.
Set up your stream key, streaming settings (don't forget to disable B-frames!), your sources. Test everything. Then ZIP this back up and hand it to your guest to use.
If you have multiple guest types (like for example you're running a tournament and you don't know which of four slots a racer will have), you can create distinct profiles. Set one bank of settings up, then go to the Profiles menu at the top of the OBS window and duplicate the profile. Switch to your second profile and set it up with a different key, then rinse and repeat. If you do this, during setup you can just tell a guest to use a specific profile.
Also if you have no reason to use a BrowserSource in this packaging of OBS, you can save about 150mb by deleting libcef.dll in obs-plugins/64bit. OBS will cleanly disable BrowserSources if you do this; it's safe.
Autoplaying OvenPlayers
Having to click "Play" on OvenPlayers every time someone connects to the server gets tedious after awhile; so autoplay would be useful. OvenPlayer has an "autoplay" setting in its options but it doesn't work entirely. It only autoplays on load if a stream is live. If you want a player interface that'll watch and wait and start automatically if someone goes live, that needs some JavaScript help.
We have a web page with one or more OvenPlayers in it by now. So let's add a very direct and somewhat hacky block of JS that'll do this for us. It looks like this:
<script>
function startPlayers() {
    OvenPlayer.getPlayerList().forEach((p) => {
        if (p.getState() != "playing") {
            p.play();
        }
    })
}

setTimeout(startPlayers, 5000);
</script>
This script creates a function that loops through all initialized OvenPlayers, checks their state, and if the state is not "playing", attempts to play. Then sets a timeout that runs this function every five seconds. This is a very brutalist direct way of saying "Every 5 seconds I want to automate clicking play on any player not currently playing".
There's much smoother ways to do this by handling state changes and tracking what player is in what state but truthfully the net effect does not change much. This will work fine for "If a stream is live on this key I want it playing no ifs, ands, or buts"
You can tweak the number in the timeout. OvenMediaEngine doesn't seem to much care about false started play requests. I've had it as low as one second on some deployments; I usually stick around three though.
Authentication
So far we haven't discussed security much. The biggest open hole here is, so far, if you can view the player interface you can get the stream URL out of it and stream to it yourself. That's bad.
OvenMediaEngine has a simple authentication webhook system to try to protect against this a bit, but it's extremely bolted on the side and you're pretty much left on your own to implement your own webhook handler. In truth OME seems to be built for a specific use-case that isn't... well... any of what we're doing here, so we have to do some work to make it fit.
The way this works is you have to set up your own HTTP server that takes a request every time someone connects to the server, and respond saying either "yes this is allowed" or "no this is not allowed". You can then append an extra GET parameter to your URL or Stream Key in OBS that the webhook inspects as if it were a password.
An extremely rudimentary example using Python and CherryPy:
import cherrypy

class Server:
    @cherrpy.expose
    @cherrypy.tools.json_in()
    @cherrypy.tools.json_out()
    def check_admission(self) -> dict:
        input_json = cherrypy.request.json

        # All connection closes should just get {}
        if input_json["request"]["status"] == "closing":
            return {}

        # Check for a secret key and allow if present
        if "password=IAmAnAuthorizedStreamer" in input_json["request"]["url"]:
            return {"allowed": True}
        else:
            return {"allowed": False}

if __name__ == "__main__":
    cherrypy.quickstart(Server())
When run this will expose http://localhost:8080/check_admission which will do an extremely simplistic password/key check before returning allowed status. This is the most basic of secret management but will prevent someone from just getting your stream URL from the player and using it.
Then you configure OvenMediaEngine to use this by finding the AdmissionWebhooks group in the Server.xml config and setting it to this:
<AdmissionWebhooks>
    <ControlServerUrl>http://127.0.0.1:8080/check_admission</ControlServerUrl>
    <SecretKey>1234</SecretKey>
    <Timeout>3000</Timeout>
    <Enables>
        <Providers>rtmp,webrtc</Providers>
        <Publishers></Publishers>
    </Enables>
</AdmissionWebhooks>
ControlServerUrl is the CherryPy servelet we just created and have running, SecretKey can be used to create a signature OvenMediaEngine places in the headers if you want an additional level of trust (but the CherryPy server should only be listening on localhost by default). The Enables section specifies what operations require passing through the webhook. In this case any Providers should require it while any Publishers should not.
The end result is anyone trying to stream must have password=IAmAnAuthorizedStreamer somewhere in their URL. Adding this to your OBS config should look like this:
- WHIP: Add
&password=IAmAnAuthorizedStreamerto the end of the URL. - RTMP: Add
?password=IAmAnAuthorizedStreamerto the end of your Stream Key.
This is the most direct and simple of examples. If you go this route to add a secret key to your stream ingest URLs, there's probably much better ways to do it, like implement actual password security instead of a hardcoded secret key. You can also inspect other components of the stream connection on top of the URL: OvenMediaEngine will pass to the webhook a user-agent, source IP address, full URL, time and date, and protocol.
Discord Webhooks
If you're already writing code to handle connection notifications as in Authentication above, you're not far from being able to dispatch webhooks and notifications when streamers connect. This might be useful if you're running some kind of community screen share or meeting server. We'll use Discord's webhooks as an example here.
Let's assume you deployed the CherryPy authentication webhook above. We can add to this a new function:
import requests

# Update me with an actual Webhook URL
DISCORD_WEBHOOK_URL = "https://discord.com/api/webhooks/0000000/1111111111111"

def send_notification():
    data = {
        "content": "A streamer is online"
    }

    requests.post(DISCORD_WEBHOOK_URL, timeout=3, json=data, headers={"Content-Type": "application/json"})
...then add to the check_admission function we already wrote, just above return {"allowed": True}, a call to this function so the check looks like this:
# Check for a secret key and allow if present
if "password=IAmAnAuthorizedStreamer" in input_json["request"]["url"]:
    send_notification()
    return {"allowed": True}
else:
    return {"allowed": False}
and now any time a streamer is authenticated and begins stream, a Discord webhook will send the message "A streamer is online".
This does have one problem: if Discord is down or laggy, the script may never send the okay back to OvenMediaEngine to allow a stream to start. The actual Right Way to handle this is to use an on_end_request handler in CherryPy to send the Discord notification only after the response has been send to OME.
More To Come...
I have a lot more I want to document here. Different interfaces, layouts that replicate Discord or MS Teams, using this for voice calls, etc.
Watch this space.
Security Considerations
Unless you implement the stuff in the "Authentication" section above, everything is open. If you know the domain, port, and application name you can stream. If you know the URL of the player interface you can view. You can tighten this a little by using application names as if they were passwords and putting player interfaces behind authentication walls like Caddy's Basic Auth support. However someone could also bypass the player interface and connect straight to the WHIP port to get video if they know the app/stream.
One significant risk is if you're exposing your OvenPlayer to the world, someone can get the WHIP URL out of it and then connect to it with their own streaming software. Additionally, if someone knows the application, they can connect to any stream key; even one they make up, and use your server as a video mule on a secret key.
This isn't acceptable but it's basically the same state we've been in for years and years with RTMP servers. OvenMediaEngine has a way to secure this stuff using an authentication webhook but you're on your own writing a handler for it.
One suggestion to save your bandwidth and prevent someone finding your server and using it for illicit purposes is to simply shut OvenMediaEngine down when not using it.
Another option is to disable the WebRTC Provider so only RTMP can be used to stream, then use a firewall to only allow specific IP addresses to stream to the RTMP port.
I need some much better tooling and guidelines here and plan to provide them; watch this space too.
Gotchas and Things I Learned the Hard Way
- You cannot autoplay one of these OvenPlayers with audio and expect it to work. You can thank Google for that. However OBS's BrowserSource turns this off and autoplay with audio works fine. In all other cases you should probably put
muted: truein the options. - OvenMediaEngine's RTMP backend can sometimes get a stream "stuck" where the streamer disconnects but the server doesn't free up the stream key. Restarting the server or using the API to force-disconnect (DELETE) the stream it will fix it.
- Speaking of the API, if you bind the API port in the config to a local address like
127.0.0.1, OvenMediaEngine happily ignores this and serves the API port on the public interfaces. Set a good API password or firewall-and-proxy the API. - OBS ignores any attempt to make it connect to WHIP over TCP, likely due to having bad or no TURN support. Until this is fixed you should make anyone not on an absolutely perfect connection use RTMP. There is a pull request open to address this. Once it reaches release I need to rewrite half this guide to eliminate RTMP...
- WebRTC by the spec will simply "give up" keeping Audio/Video sync if the stream timestamps diverge more than 250ms. JitterBuffer helps keep this from happening but if someone has extremely bad connectivity it may happen anyway.
- Vivaldi seems to do WebRTC slightly wrong. I don't know how. If you get weird bugs make sure your reporter isn't using Vivaldi.
- OBS in certain configurations will begin building up its own internal buffer if it detects lossy connection to the server. If you're doing something realtime critical like a race, that may be bad. I believe this is "Dynamically change bitrate" in Advanced.